Mousetrap Design Project
by Derin Manay
Mousetrap Design Project – by Derin Manay 6/29/2023 EN.500.109
Explore Engineering Innovation – Instructor: Mr. Rich Schneider
This project consists of a design of a mouse trap and its instructions to build it properly. The overall design involves a spring-loaded mechanism created by a rubber on a triangular prism chamber to
capture a ping pong ball. The triangular shape is selected to create a simple and strong structure to resist the rubber band spring forces and to create a sensitive, quick acting tripping mechanism. The assembly consists of 4 parts:
-
Main frame
-
Rear Cap
-
Front Gate
-
Spring (rubber band)

The picture of the completed design can be seen below:
Front View Back View
Materials needed for the construction:
-
Stiff paper x 2 (8.5” x 11”)
-
Rubber band x 1
-
Paper glue stick
Materials needed to aid the build:
-
Pencil
-
Ruler
-
Scissors
Material needed to verify design functionality:
-
Ping Pong Ball
-
Cell phone camera
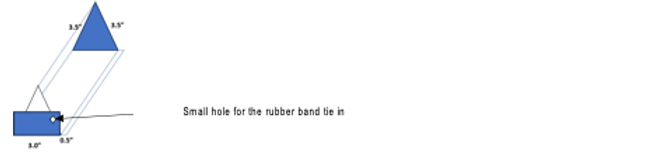
Step 1: Mark one of the stiff papers by a ruler to create folding lines parallel to the shorter side of the paper in every 3.5”. Leave the last 0.5” at the end and mark the folding line for the line, as well. See the figure below showing the folding line marks:

Step 2: Fold the paper from the folding lines to create a triangular prism. This will create the main frame, which is the chamber that is to capture the ping pong ball at the later stages.

3.0” 0.5” Figure 2: Triangular prism for the (1) main frameStep 3: Glue the ½” strip over the base of the paper towards the right side of the triangle.

Figure 3: (1) Main frame assembly glue application
Step 4: Now we are going to create the rear cap of the prism. For this, you will need to grab the second stiff paper and cut a 3” x 3.75” rectangle and mark the folding lines as shown in the figure below:

Step 5: Once you fold the lines to create the (2) rear cap cover, glue the 0.5” strip below the base of the prism and the top triangles over the side wall of the prism.

Figure 5: Installation of the (2) rear cap
Step 6: This step involves creating the (3) front gate of our trap. It is important to make the front gatestrong to prevent it bending from the force of the rubber band spring. To do this, we will need to cut out a long, 3” x 5”, section of the second stiff paper and fold it over three times.

Figure 6: (3) Front gate fold lines
Step 6: Apply glue between each layer and fold it over the lid three times to create a 1.5” x 3” piece with the 0.5” strip at the end.

Step 7: Glue the 0.5” strip below the base of the triangular prism.

Step 8: Drill a small hole using scissors or your pencil at the top right corner of the (3) front gate.